jeudi 9 août 2018

How to migrate certification authority to new server


In this topic , we will explain step by step how to migrate certification Authority to another server.
 In our example we will try to migrate CA server installed on Windows 2008 R2 to new server under Windows 2016:

Backup certification authority:

  • The CA backup can be performed through the CA wizard:

  • Click on next to continue:


  • On this page check the two options and spécify the path of backup then click Next:


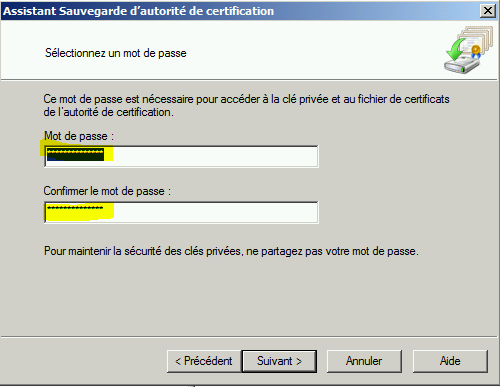
  • A new password is required to access on backup files:

  • Click on finish:

  • On backup path, we find all backed up files:


Export registry keys :

Export registry keys from this path HKLM\SYSTEM\CurrentControlSet\Services\CertSvc\Configuration:


Remove CA role from old server:

To be able to reuse the name of old server , you have to remove the CA role before rename it.
  • From server manager, you can perform the CA uninstalling:

  • Click on remove:


  • Restart the server to finish:


Now you can rename the old server.

Install new server with the same name as old server and restore CA certificate and database:

Install the role certification autority on new server then start the AD CS configuration:
  • Specify the credentials then click on Next:


  • Select Certification Authority role then click on NEXT:


  • Specify the Type of the CA then click  on NEXT:


  • Select the type of CA then click NEXT:


  • Select the option Use existing private key:


  • Click on Import:


  • Specify the existing Certificate:


  • Select on Certificate and click on NEXT:


  • Add the database locations then select NEXT:


  • Click on confirmation:


  • Click on close:


  • Open CA console then click on Restore:


  • Click on NEXT:


  • Specify the path and select the 2 items to restore:


  • Specify the password:


Once you complete database restoration , you can restore registry keys backed up from the old Server.


mardi 1 mai 2018

How to migrate the SYSVOL replication system from FRS to DFS-R

Since Windows Server 2008,  DFS-R can be used for SYSVOL replication instead of FRS.
A domain controller on Windows Server 2019 is no longer compatible  with FRS for SYSVOL replication.
If you still use FRS for SYSVOL replication, you have to migrate to DFS-R to be able to add an additional domain controller on Windows Server 2019.
If the first domain controller is promoted on Windows 2008 or higher and the Domain functional level is Windows 2008 or higher  , DFS-R will be automatically used for SYSVOL replication.
In this article, I will show you how to migrate SYSVOL replication system from FRS to DFS.

Prepare prerequisites:

  • All domain controller running on Windows Server 2003 must be demoted 
  • The Domain Functional Level must be 2008 or higher :


  • Check the replication status and domain controllers health:


  • Check the DFSR migration status, you can use the following command:
    dfsrmig /getglobalstate

Before starting the migration, you can check the current sysvol path by running the  command net share on each domain controller:


You can also check the SYSVOL path from registry key:


How to migrate SYSVOL replication system to DFS-R:

  • Run the following command to start the migration:
dfsrmig /setglobalstate 0
  • Run the following command to change the migration state from "Started" to "Prepared" on all domain controller:

dfsrmig /setglobalstate 1


During in this step a new folder named SYSVOL_DFSR will be created on all domain controllers:


Run the following command to check if all domain controllers are migrated to "Prepared" state before performing the next step:

dfsrmig /getglobalstate
  • Run the following command to change the migration state from "Prepared" to "Redirected":

dfsrmig /setglobalstate 2

During in this step, it is recommended to avoid any modification on sysvol share ( GPO,script..ect) because the SYSVOL folder will be moved to  SYSVOL_DFSR.We can check it from the registry key value once the domain controller status become "Redirected":

We can also use net share to check the new path of sysvol share:

Run the following command to check if all domain controllers are migrated to "Redirected" state before performing the next step:

dfsrmig /getglobalstate
  • Run the followings command to change migration state from "Redirected" to "Eliminated":
dfsrmig /setglobalstate 3
 

In this step , the old folder sysvol will be deleted:

The Ntfrs service will be also disabled  on all domain controllers:


Run the following command to check if all domain controller are migrated to "Eliminated" state:

dfsrmig /Getglobalstate


mardi 20 février 2018

How to backup and restore GPO settings

 Before GPO setting modification, the backup is recommended practice to simplify the rollback in case of problem.

In this article, we will explain how to back up, restore, and import GPO settings using GPMC and PowerShell.
We have created new GPO named test1 with the following settings:


How to backup a GPO:

Backup GPO using GPMC ( Group Policy Management console):

Below the different steps of GPO backup via GPMC
  • Go under Group Policy Objects, find your GPO and choose the backup option as shown  below:

  • Add the path where you backup GPO and click Backup:
  • Click OK to finish:

Backup GPO using PowerShell commands:

You can also perform GPO backup using  PowerShell using the following commands :

import-module grouppolicy
Backup-Gpo -Name GPO_Name -Path Backup_location

How to restore a GPO:

Restore GPO using GPMC ( Group Policy Management consol):

I have reset GPO settings of test1, to test the restoration:


Below the different steps of GPO restoration via GPMC : 
  • Go under Group Policy Objects, find your GPO and click on Restore from Backup  as shown  below: 
  • Click Next:
  • Add the backup path and click Next:
  • Select the backed up GPO and click Next:
  • Click Finish:
  • Click OK:

Restore GPO using Powershell :

You can also use PowerShell to restore a GPO :

import-module grouppolicy
Restore-GPO -Name "Test1" -Path "E:\BacckupFolder"

How to import a GPO settings from a backup:

We are able import GPO settings from backup into another GPO, before perform this task, it's recommended to backup the target GPO before the import.

Import GPO using GPMC (Group Policy Management Console):

Below the different steps of GPO importation via GPMC : 
  • Go under Group Policy Objects, find the target GPO and click on Import Settings as shown  below: 
  • Click Next:
  • In this step you can backup the target GPO then click Next:
  • Add backup folder and click Next:
  • Select the backed up GPO and click on Next:
  • Click  Next:
  • Click Finish:
  • Click OK:

Now, all the settings of backed up GPO  has been imported on target GPO TEST2 as shown below:

Import GPO using PowerShell:

The followings commands can be used to import GPO settings from backup to another GPO:

import-module grouppolicy
Import-Gpo -BackupGpoName "Backup_GPO_Name" -TargetName "Targer_GPO_Name" -Path "Backup_Location"

How to reset the settings of defaults GPO:

When you promote new domain, there are two GPO created automatically named Default Domain Policy linked to domain and Default Domain Controller Policy linked to Domain controller OU.

To reset only the GPO settings of Default Domain Policy , run the following command:
bypass the compatibility issue between the schema version and the operating system

dcgpofix /ignoreschema /target:Domain
To reset only the GPO settings of Default Domain Controller  Policy , run the following command:

dcgpofix /ignoreschema /target:DC
To reset the GPO settings of the both Default GPO , run the following command:

dcgpofix /ignoreschema /target:both